The Anatomy of a Slow-Motion Disaster
You’re sitting in your living room, watching the sleet bounce off the windowpane, when you hear it. A slow, rhythmic tink, tink, tink. It’s not coming from the kitchen sink. It’s coming from the fireplace. You look up, and there’s a tea-colored stain spreading across your white ceiling like a bruise. Most homeowners call local roofers thinking they have a ‘shingle leak.’ But after 25 years of crawling over steep-pitch disasters, I can tell you: if that leak is near the masonry, your shingles are likely fine. Your flashing, however, is a crime scene.
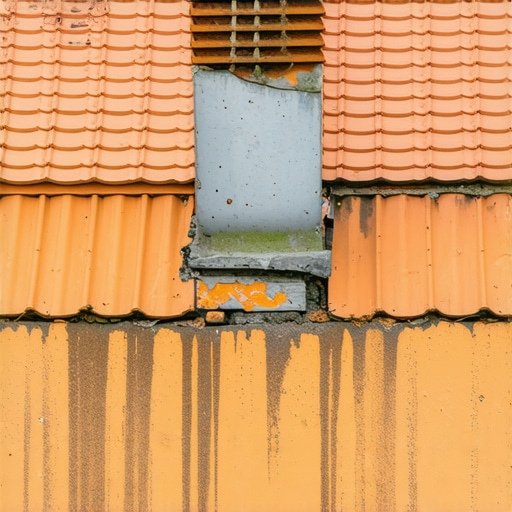
Walking on that roof felt like walking on a wet sponge. I knew exactly what I’d find underneath before I even pulled my hammer. The client had hired one of those roofing companies that promises a ‘lifetime warranty’ but doesn’t know the difference between a reglet and a rivet. Under the ‘new’ shingles, the plywood was so saturated you could poke a finger through it. The culprit? A chimney flashing job that looked like it was done by someone who’d only ever seen a roof in a coloring book. They had relied on ‘the caulk-and-pray’ method, and the house was paying the price.
The Physics of the Failure: Why Chimneys Are Water Magnets
Chimneys are essentially giant bricks of porous material sticking out of your roof. In cold climates like ours, where the temperature swings from 40°F to -10°F in a single night, the chimney and the roof deck are constantly at war. They expand and contract at different rates. This ‘differential movement’ is the primary reason why flashing fails. If your flashing is rigid, it snaps. If it’s poorly integrated, it becomes a funnel.
“Flashings shall be installed in such a manner as to prevent moisture from entering the wall and roof through joints in copings, through moisture-permeable materials and at intersections with curbage or projected areas.” – 2024 International Residential Code (IRC) R903.2
When local roofers ignore the mechanics of capillary action, gravity takes a backseat. Water can actually ‘climb’ upward between two flat surfaces—like a shingle and a piece of metal—if the gap is narrow enough. Without a proper offset or a hemmed edge, that melting snow from an ice dam will migrate horizontally across your roof deck until it finds a shiner (a nail that missed the joist) and drips directly onto your insulation. This is how underlayment rot begins its quiet takeover of your home.
Sign 1: The ‘Caulk-Monster’ and Pitted Sealants
The first sign of 2026-era flashing failure is the presence of excessive, cracking sealant. Look at the top edge of your flashing where it meets the brick. If you see a thick, rubbery bead of silicone or ‘blackjack’ tar that looks like it’s peeling away, you have a ticking time bomb. Professional roofing companies don’t rely on caulk to stop water; they use counter-flashing. This is a second layer of metal that is actually embedded into a groove cut into the brick (the reglet). This ensures that water running down the chimney face is shed over the base flashing, not behind it. If your roofer just smeared a tube of goo over the joint, that sealant will eventually shrink and crack under the relentless UV and freeze-thaw cycles, creating a direct path to your decking. You might notice decking rot around the chimney perimeter before you even see a drop inside.
Sign 2: Interior Masonry Efflorescence
Go into your attic or look at the brick inside your fireplace. Do you see a white, chalky powder? That’s efflorescence. It’s not just ‘dust.’ It’s the mineral salt left behind after water has traveled through the masonry. This signifies a massive failure in the cricket or the head flashing. A chimney wider than 30 inches is legally required by code to have a cricket—a small peaked ‘mini-roof’ behind the chimney that diverts water to the left or right. Without a cricket, water pools behind the chimney, creating a ‘dead valley.’ This standing water exerts hydrostatic pressure against the flashing. Even a pinhole will eventually let gallons of water through. If you ignore this, you’ll eventually see the corner gaps open up as the wood framing swells and warps.
Sign 3: Shingle Lift and ‘Backwater’ Leaks
The third sign is shingles that appear to be ‘lifting’ or pushing away from the base of the chimney. This usually happens because the step flashing (individual pieces of L-shaped metal woven into each shingle course) was installed without enough ‘kick-out.’ In a cold climate, when snow sits on the roof, it melts from the bottom up due to attic heat loss. This meltwater flows down until it hits the chimney. If the flashing isn’t properly lapped, the water backs up under the shingles. This ‘backwater’ effect is why chimney leaks are so devastating—they don’t just affect the chimney; they rot the surrounding three to four squares of shingles from the inside out.
“A roof is only as good as its flashing.” – Old Roofer’s Adage
The Fix: Surgery vs. Band-Aids
When you call roofing companies to address these issues, be wary of the guy who says he can ‘seal it right up’ from the outside. That’s a band-aid. True forensic repair involves tearing off the shingles around the chimney, inspecting the plywood, installing a high-temp ice and water shield that goes at least 12 inches up the masonry, and then installing new 26-gauge galvanized or copper flashing. Don’t let them reuse the old metal. Once metal has been nailed through, it’s compromised. Saving a few bucks on ‘recycled’ flashing is how you end up with another leak in two years. The cost of a proper flashing job is high, but the cost of replacing your living room floor and a moldy attic is ten times higher. Do it once, do it right, and let the trunk-slammers ruin someone else’s house.