The Autopsy of a Living Room Leak
You smell it before you see it. That unmistakable, heavy scent of moldy cellulose insulation and damp drywall. I was standing in a living room in a neighborhood where the homes weren’t more than five years old, looking at a brown, concentric circle on the ceiling directly beneath a valley. The homeowner was baffled. ‘The local roofers were just here last year,’ he said. I climbed up and what I found was a textbook case of a failure in the V-channel. It wasn’t just a leak; it was a slow-motion disaster caused by a fundamental misunderstanding of hydraulics. Water doesn’t just flow down; it hunts for gaps. When it hits a valley, it gathers speed and volume. If that flashing isn’t secured with forensic precision, the roof is nothing more than a sieve.
My old foreman used to say, ‘Water is patient. It will wait for you to make a mistake.’ In thirty years on the deck, I’ve seen that patience pay off for water and ruin the bank accounts of homeowners. Valleys are the most vulnerable points on any square of roofing. This is where two planes meet, creating a high-velocity drainage canal. In our climate, where ice dams are a winter reality and torrential rains hit in the spring, a valley isn’t just a junction—it is a pressure cooker. If you don’t secure the flashing correctly, you are inviting the environment into your attic.
“A roof is only as good as its flashing.” – Old Roofer’s Adage
The Physics of Failure: Why Valleys Give Up
To understand how to secure valley flashing, you have to understand the physics of water movement. When heavy rain hits those two massive planes, it converges in the valley. This creates hydrostatic pressure. Water is heavy, and as it rushes down, it wants to push sideways. If the shingles are pinned too close to the center of the valley or if the flashing isn’t wide enough, the water will actually use capillary action to pull itself uphill, underneath the shingles. This is why you often see signs of poor valley drainage long before the ceiling starts dripping. The water is already rotting the plywood underneath, turning it into something that resembles soggy oatmeal.
Another common culprit is the ‘shiner.’ A shiner is a nail that was driven through the flashing in the wrong place. If a roofer puts a nail within 6 inches of the center of the valley, they’ve just created a direct path for water. As the metal flashing expands and contracts in the 140°F summer heat and the -10°F winter nights, that nail hole stretches. Eventually, it’s not just a hole; it’s a spout. This is one of the top reasons for flashing failure. The metal moves, the nail stays put, and the waterproofing is compromised.
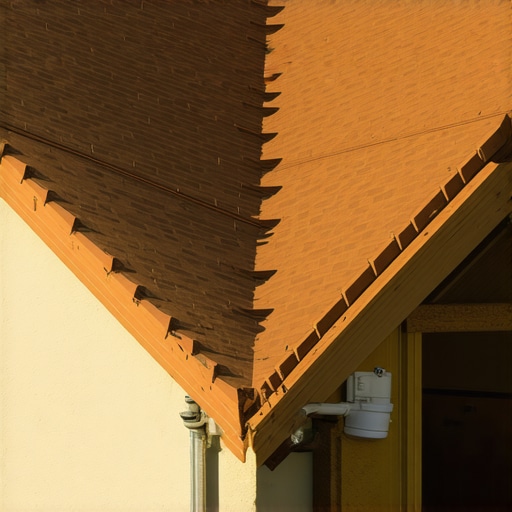
The Anatomy of a Secure Valley
Securing a valley starts long before the metal hits the wood. You need a foundation of a high-quality ice and water shield. In northern climates, this is non-negotiable. This self-adhering membrane seals around every fastener, providing a secondary defense if the metal ever fails. You can’t just use standard felt here. You need the best underlayments for extreme weather to ensure that even if a shingle lifts, the deck remains dry. Once that membrane is down, we talk about the metal. We use 26-gauge galvanized steel or copper, usually with a ‘W’ bend. That middle ‘W’ rib is there for a reason: it breaks the cross-flow of water from one side of the roof to the other, preventing it from rushing up under the shingles on the opposite plane.
“Flashings shall be installed in a manner that prevents moisture from entering the wall and roof through joints in copings, through moisture-permeable materials and at intersections of built-up roofing manifolds.” – International Residential Code (IRC)
When it comes to fastening the metal, you never nail the center. You nail the edges, using a ‘clip’ system if you’re dealing with long runs of copper, or by nailing the outer inch of the metal. This allows the metal to breathe. If you pin it down tight, it will buckle. A buckled valley is a dead valley. The shingles then need to be cut back away from the center to create a clean ‘open’ valley, or woven with extreme care. If you find yourself needing fixes for loose roof valley seam flashing, it’s usually because the original installer skipped the edge-seal or used the wrong gauge of metal that warped over time.
The Forensic Fix: Surgery over Band-Aids
I see a lot of roofing companies try to fix valley leaks with a tube of caulk. It’s a joke. Caulk is a temporary band-aid on a structural wound. In the heat of the sun, caulk dries out, cracks, and peels away within two seasons. The only way to truly secure a failing valley is ‘surgery.’ This means tearing off the shingles at least two feet back on either side, removing the old, rusted, or improperly installed metal, and starting from the deck up. You have to inspect the rafters for sag, as a sagging valley will hold water like a gutter, leading to even faster decay. If you’ve noticed the roofline dipping, you might be looking at structural rafter sag that needs immediate attention before the new valley is even laid.
The cost of waiting is the cost of your home’s integrity. A valley leak doesn’t just stay in the valley. It travels down the rafters, into the walls, and onto your floor joists. By the time you see the spot on the ceiling, the damage has been done for months, if not years. Don’t trust a ‘trunk slammer’ with a bucket of tar. Insist on seeing the ice and water shield. Insist on a heavy-gauge W-valley. And for the love of the craft, make sure they keep the nails out of the center. Anything less is just a countdown to the next storm.