The Forensic Autopsy: When the Ridge Becomes the Point of Entry
Walking on that roof felt like walking on a sponge. I knew exactly what I’d find underneath. It was a 6-on-12 pitch in Charleston, just a few miles from the salt spray of the Atlantic. The homeowner was baffled. They had paid for a high-end architectural shingle ‘system’ only two years prior, yet the master suite smelled like a damp basement every time a tropical depression rolled through. Most local roofers would have just looked at the pipe boots and left, but a forensic eye knows that water doesn’t always come from where it drips. I pulled my pry bar and lifted a single cap shingle at the ridge. The plywood was black, the fasteners were bleeding rust, and the ‘sealant’ was a dry, brittle ribbon of cheap caulk that had long since surrendered its bond. This wasn’t a material failure; it was a physics failure.
In the Southeast, where humidity is a permanent resident and wind-driven rain can hit a house sideways at 60 miles per hour, the ridge vent is the most vulnerable five inches of your entire structure. It is the high ground. If the seal fails here, gravity and pressure differentials do the rest of the dirty work. When you have a poorly sealed ridge vent, you aren’t just dealing with a leak; you’re dealing with a breach in your home’s primary pressure-release valve. Most roofing companies treat the ridge as an afterthought, a quick way to finish the job and get the check, but if you don’t understand the Bernoulli principle, you shouldn’t be touching a ridge cap.
“A roof is only as good as its flashing and its highest termination point.” – Old Roofer’s Adage
Sign 1: The ‘Ghost’ Stains on the Ridge Board
The first sign of poor ridge vent sealing is rarely a drip. It’s a shadow. If you go into your attic during a bright afternoon, look at the very peak where the rafters meet the ridge board. If you see dark, mottled staining or white, fuzzy efflorescence, you have a sealing problem. What’s happening here is Mechanism Zooming: during a heavy rain, wind hits the windward side of your roof, creating a high-pressure zone. This pushes air (and moisture) up the slope. If the ridge vent isn’t perfectly seated and sealed with a high-quality butyl tape or specialized closed-cell foam, that high-pressure air forces water into the gap. It doesn’t pour in; it ‘mists’ in. This fine spray hits the ridge board, soaks in, and begins the slow process of rot. Over time, this moisture leads to hidden decking plywood decay, which can turn your structural support into something with the structural integrity of a wet cardboard box.
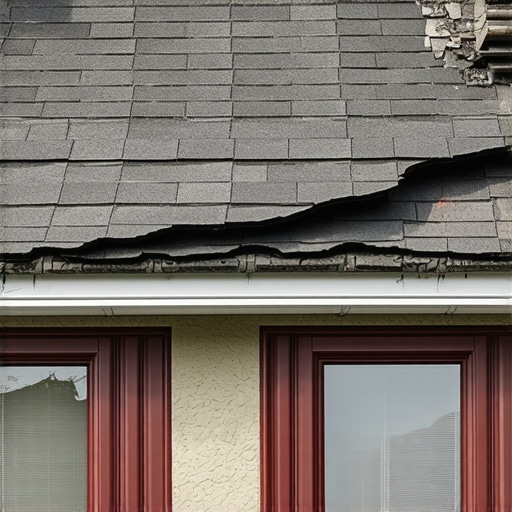
Sign 2: The ‘Shiner’ Bleed and Fastener Back-out
A ‘shiner’ is what we call a nail that missed the rafter, but in the context of a ridge vent, it refers to the fasteners holding the vent itself down. In high-heat zones like the Southeast, thermal expansion is a beast. A 40-foot ridge vent can expand and contract significantly between a 140°F afternoon and a 70°F night. If the roofer used standard galvanized nails instead of stainless steel or didn’t use the manufacturer-specified length to hit the meat of the wood, those fasteners will eventually ‘back out.’ Look at your ridge line from the ground. Do the cap shingles look wavy? Do you see the heads of nails poking through the asphalt? If those fasteners are exposed, water will follow the shank of the nail straight down into the rafter tail. Once that happens, you’re looking at hidden rafter rot. If you see these signs, you need to consult the best ways to install ridge vents to ensure the fastener schedule is corrected before the next storm season.
Sign 3: Interior Humidity Spikes and Attic ‘Bypass’
Sometimes the sign isn’t visual; it’s sensory. If your HVAC system is struggling to keep the upstairs cool despite having ‘plenty of insulation,’ your ridge vent seal might be the culprit. A poorly sealed vent allows for ‘short-circuiting’ of the ventilation system. Instead of pulling cool air from the soffits and exhausting hot air at the peak, a gap in the ridge vent seal allows hot, humid exterior air to be sucked directly into the attic by the same pressure differential that’s supposed to be cooling it. This creates a pocket of stagnant, wet air right against your roof deck. You’ll notice your attic feels like a sauna even at night. This lack of proper flow is a major contributor to attic draft issues. When moisture can’t escape, it clings to the underside of the shingles, baking them from both sides and significantly shortening their lifespan.
“Effective attic ventilation requires a balanced system of intake and exhaust, and any breach in the seal at the ridge compromises the thermal envelope of the entire building.” – International Residential Code (IRC) Commentary
The Surgery: How to Fix a Compromised Ridge
Don’t let a ‘trunk slammer’ tell you that a tube of silicone will fix a leaking ridge. That’s a band-aid on a gunshot wound. The only real fix for a poorly sealed ridge vent is a partial tear-off. You have to remove the cap shingles, unscrew the vent sections, and inspect the starter strip and the top edge of the field shingles. We often find that the ‘roofer’ forgot to install the end caps on the vent, or they didn’t use a cricket or proper flashing where the ridge meets a vertical wall. To do it right, you need to use a high-performance sealant and ensure the vent is pinned down with stainless steel ring-shank nails. If you are worried about moisture entry during this process, check out how to stop water entry at attic joint seals. This isn’t just about keeping the rain out; it’s about protecting the ‘Square’ of your investment. Every 100 square feet of roofing you have to replace early because of a $50 vent mistake is money out of your retirement fund. Demand better from your roofing companies. Ask for photos of the ridge seal before the cap shingles go on. If they won’t show you, they have something to hide.