The Anatomy of a Slow-Motion Disaster
The first sign isn’t usually a puddle on the living room floor. No, it starts as a faint, brownish-orange smear against the brickwork—a streak that looks like a coffee stain on the side of your house. By the time most homeowners call local roofers, the physics of failure has been in motion for years. I’ve spent over two decades on the roof deck, and I can tell you that a chimney is a giant hole in your house that the weather is constantly trying to exploit. When you have metal meeting masonry, you have two materials that expand and contract at different rates, fighting each other every time the sun comes out or the snow starts to stack up.
Walking on that roof felt like walking on a soft, damp sponge. I knew exactly what I’d find underneath before I even pulled my pry bar out. As I peeled back the shingles around the masonry, the smell hit me—that unmistakable, heavy scent of fermented wood and mold. The chimney flashing, which should have been a crisp L-shaped barrier, had oxidized into a brittle, flaky mess that crumbled between my fingers. The local roofing companies who had worked on this place five years prior had made the classic mistake: they used cheap galvanized steel in a high-moisture zone and skipped the counter-flashing entirely. They relied on a thick bead of roof cement to do the job of actual metalwork.
The Physics of the ‘Orange Weep’
When we talk about chimney flashing rust, we are talking about the breakdown of the protective zinc coating on the metal. In our climate, where the winter air holds onto dampness and the freeze-thaw cycle is relentless, that metal is under constant thermal shock. As the chimney heats up from the fireplace inside, it expands. Meanwhile, the roof deck is cold. This movement creates micro-cracks in the sealants. Once water gets behind the flashing, it’s game over. Through capillary action, moisture is sucked upward and sideways, defying gravity to find a way into your attic. It doesn’t just sit there; it reacts with the carbon in the steel, starting the oxidation process that eventually eats a hole right through the valley of the flashing.
“Flashing shall be installed at wall and roof intersections, wherever there is a change in roof slope or direction and around roof openings.” – International Residential Code (IRC) R903.2
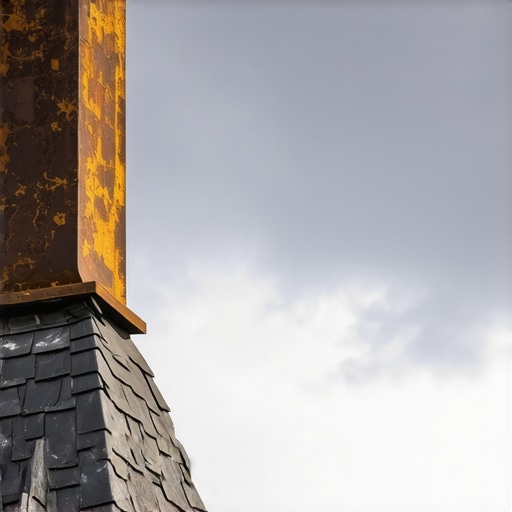
Sign 1: Pitting and Flaking Along the Apron
The first sign you’ll notice from the ground—if you have a good pair of binoculars—is pitting. This isn’t just dirt. It looks like the metal has developed a bad case of acne. In my experience, this happens when the protective layer is compromised by salt air or industrial pollutants. If you see the metal starting to flake away like an old croissant, the structural integrity of that flashing is gone. You aren’t just looking at a cosmetic issue; you’re looking at a sieve. Once the pitting goes deep enough, the ‘orange weep’ begins, where rust-colored water runs down the shingles. This rust actually degrades the asphalt granules on your shingles, causing them to bald prematurely. This is why local roofers often find themselves replacing several squares of shingles around a chimney even if the rest of the roof is fine.
Sign 2: The Failed Reglet and Masonry Separation
The second sign is more subtle. It happens at the ‘reglet’—the groove cut into the brick where the counter-flashing is tucked. If the mortar around this cut is cracking or turning to powder, moisture is getting behind the metal. Most roofing companies today are too lazy to do a proper two-part flashing system. They’ll just ‘surface mount’ the metal and slap some caulk on top. That caulk will last two seasons, maybe three. After that, it pulls away, and the metal underneath, now exposed to trapped moisture on both sides, begins to rust from the inside out. I’ve seen 26-gauge steel look like lace because water was trapped between the metal and the brick with no way to evaporate. You need a cricket—a small peaked structure behind the chimney—to divert that water, or it just pools and eats the metal.
“A roof system is only as effective as its weakest link, which is almost always the flashing details at vertical penetrations.” – National Roofing Contractors Association (NRCA)
Sign 3: Attic Bypass and Thermal Bridging Stains
The third sign requires you to get into the ‘hot zone’—your attic. If you see dark stains on the rafters or the plywood sheathing around the chimney, you have a failure. Sometimes, it’s not even a direct leak. It’s condensation. The metal flashing acts as a thermal bridge. If it’s rusting, it’s often because warm, moist air from your house is escaping into the attic (what we call an attic bypass) and hitting that cold metal flashing. The water condenses, stays wet, and rusts the metal from the attic side. You’ll see ‘shiners’—nails that missed the rafter and are now covered in frost or rust—near the chimney. This is the forensic proof that your flashing system is failing to regulate temperature and moisture. By the time you see a brown circle on your bedroom ceiling, the wood underneath your roof is likely already starting to rot.
The Fix: Surgery vs. Band-Aids
You’ll have plenty of ‘trunk slammers’ show up at your door offering to ‘seal it up’ for a few hundred bucks. They’ll use a bucket of ‘bull’ (roof cement) and smear it all over the rust. This is a death sentence for your roof. Roof cement dries out, cracks, and actually traps more water against the metal, accelerating the rust. The only real fix is surgery. You have to tear off the shingles around the chimney, grind out the old mortar joints, and install new copper or heavy-gauge lead-coated shingles and counter-flashing. It’s an art form. You need a roofer who knows how to bend metal on a break so that it sheds water naturally, using nothing but gravity and smart overlaps. If you ignore the rust in 2026, you’re not just looking at a new flashing job in 2027; you’re looking at replacing rotten rafters and moldy drywall, which can easily triple your costs. Water is patient. It will wait for you to make a mistake, and rust is the proof that it won.
This article hits home for me because I recently discovered some rust stains near my chimney after noticing a slight brownish smear on the brick. I had always assumed it was just dirt, but now I realize it might be the early signs of flashing deterioration. What really stood out was the importance of proper installation techniques, like using copper or lead-coated shingles and ensuring the reglet is sealed correctly. I’ve learned that quick fixes with roof cement might seem like a short-term solution, but they often exacerbate the problem by trapping moisture. Personally, I’ve had a roofer redo my flashing with a proper metalwork technique, and it’s made a huge difference in preventing leaks. Has anyone here had experience with non-traditional materials or DIY repairs? I’d be curious to know what approaches have worked or failed for others in maintaining chimney integrity over the years.